Golf Club
Course Guide
| HOLE | 1 | 2 | 3 | 4 | 5 | 6 | 7 | 8 | 9 | OUT | - |
| PAR | 4 | 4 | 5 | 4 | 3 | 4 | 5 | 3 | 4 | 36 | 0 |
| BLACK | 433 | 427 | 555 | 461 | 187 | 392 | 557 | 212 | 471 | 3695 | 0 |
| BLUE | 395 | 389 | 527 | 430 | 168 | 368 | 512 | 3182 | 433 | 3404 | 0 |
| WHITE | 355 | 358 | 499 | 387 | 134 | 311 | 493 | 139 | 401 | 3077 | 0 |
| RED | 318 | 337 | 467 | 315 | 124 | 287 | 451 | 111 | 372 | 2782 | 0 |
| INDEX | 6 | 14 | 10 | 2 | 18 | 12 | 8 | 6 | 4 | - | 0 |
| HOLE | 10 | 11 | 12 | 13 | 14 | 15 | 16 | 17 | 18 | IN | Total |
| PAR | 4 | 5 | 3 | 4 | 4 | 4 | 3 | 5 | 4 | 36 | 72 |
| BLACK | 418 | 552 | 202 | 338 | 476 | 436 | 194 | 536 | 482 | 3634 | 7329 |
| BLUE | 390 | 520 | 192 | 314 | 439 | 394 | 184 | 488 | 452 | 3373 | 6777 |
| WHITE | 383 | 483 | 162 | 277 | 403 | 370 | 165 | 453 | 416 | 3112 | 6189 |
| RED | 347 | 441 | 142 | 252 | 361 | 334 | 152 | 410 | 380 | 2819 | 5601 |
| INDEX | 13 | 9 | 7 | 17 | 1 | 15 | 5 | 11 | 3 | - | - |
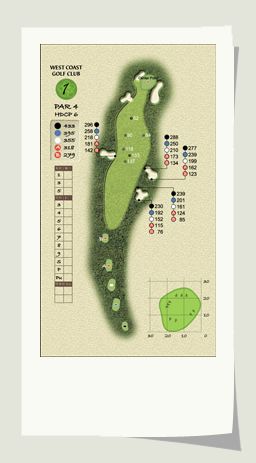 【Hole 1: Par 4】 A straight-away par 4 with generous landing area at around 200-220 yards from the tee. A good drive will leave a short to mid iron approach to a green guarded by one bunker at the front/right. The green slopes back to front. |
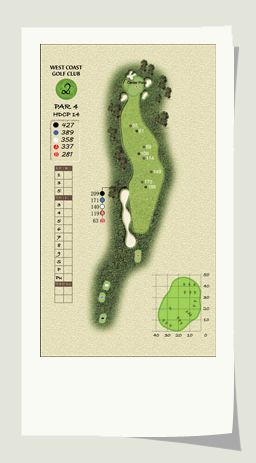 【Hole 2: Par 4】 Medium length par 4. There is a large bunker to clear 170 yards from the tee, the fairway opens up on the right which isn’t visible from the tee. A solid tee shot will leave most players with a short to mid iron approach to a green that is quite deep from front to back. There is a bunker with a large face at the front/left of the green. The front of this green has a severe slope, if the pin is positioned in the front portion of the green be sure to keep your approach below the hole. |
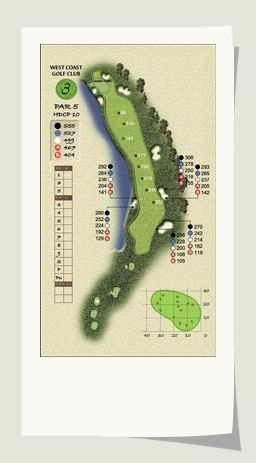 【Hole 3: Par 5】 This par 5 is a pretty severe dog-leg left with water guarding the entire left side of the hole. The safe play is to favour the right side of the fairway from the tee, playing this as a 3-shot hole. |
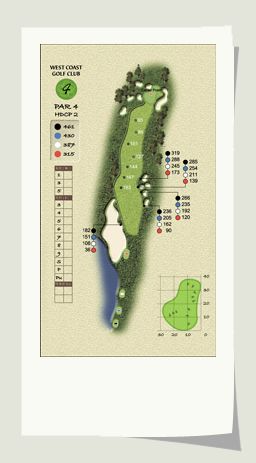 【Hole 4: Par 4】 This is a slightly longer par 4 than the opening 2 holes, but with a very generous landing area off the tee. There are bunkers spotted along the right side of this fairway so a well-placed tee shot will be down the left side leaving a mid to long iron approach. The green is fairly narrow, but long from front to back with bunkers at the front left and right. Par is a good score here. |
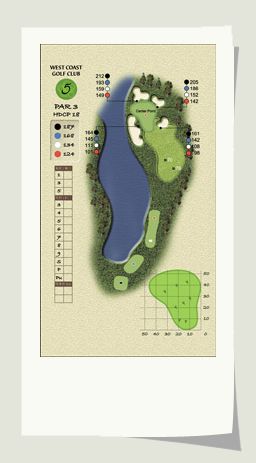 【Hole 5: Par 3】 A medium length, tricky par 3 with water along the left from tee to green. The green complex is guarded by bunkers to the left, right and back. The putting surface is a 3-tier design so a well-placed tee shot is vital for any chance at birdie or at saving a two-putt par. |
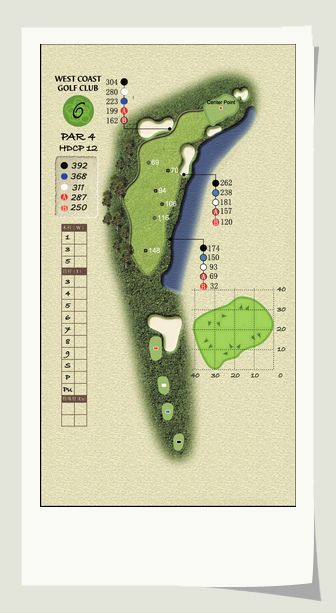 【Hole 6: Par 4】 This hole puts a premium on placement of your tee shot. What it lacks in length, it makes up for in difficulty. With water protecting the entire right side of the hole a tee shot of 180-200 yards will do just fine leaving a short to mid iron to the green. The green is narrow from front to back with a couple bunkers guarding the green. Don’t be too greedy with your approach as there is a severe slope to this putting surface from the middle to right side. Par will suffice here with a chance to get one back on the next hole. |
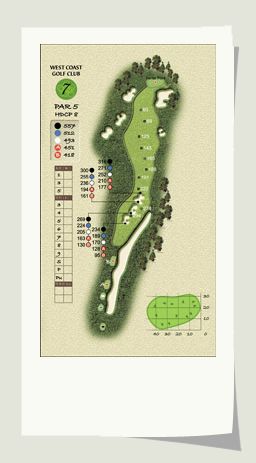 【Hole 7: Par 5】 A definite birdie opportunity, this par 5 gives players a chance to get a shot back that they may have lost over the first few holes. A long bunker complex runs up the middle of the fairway, most players will have to choose going either left or right of the bunkers. But the longer hitters can have a go at taking it right over them, leaving a second shot of 220-240 yards for a chance at reaching this green. The green is fairly forgiving with the only real trouble being a large bunker at the front right side. |
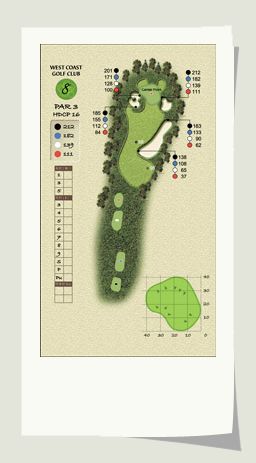 【Hole 8: Par 3】 This is a good test of a par 3, with the green sloping quite severely from front to back. If the pin position is back/left it brings the bunker at front/left into play and doesn’t leave much room for error if you go long with only about 10 yards from the back of the green to the bush area beyond the cart path. A good play is to the middle of the green here, be satisfied with a score of 3 here as being too aggressive on this slippery putting surface can bring 4 and 5 into play. |
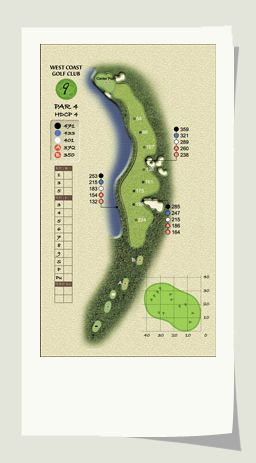 【Hole 9: Par 4】 This is by far the toughest hole at West Coast Golf Club. It has all the elements of a great test of golf; length, water, plenty of well-placed bunkers and a tricky green that is long and narrow. Be sure to get your ball in the fairway off the tee. Playing this hole as a par 5 is not a bad approach, do what is takes to eliminate the very common double or triple bogey on hole number 9. If you can walk away with a par here you should have the feeling of having made birdie and take this confidence with you to the back nine. |