Golf Club
Course Guide
| HOLE | 1 | 2 | 3 | 4 | 5 | 6 | 7 | 8 | 9 | OUT | - |
| PAR | 4 | 4 | 5 | 4 | 3 | 4 | 5 | 3 | 4 | 36 | 0 |
| BLACK | 433 | 427 | 555 | 461 | 187 | 392 | 557 | 212 | 471 | 3695 | 0 |
| BLUE | 395 | 389 | 527 | 430 | 168 | 368 | 512 | 3182 | 433 | 3404 | 0 |
| WHITE | 355 | 358 | 499 | 387 | 134 | 311 | 493 | 139 | 401 | 3077 | 0 |
| RED | 318 | 337 | 467 | 315 | 124 | 287 | 451 | 111 | 372 | 2782 | 0 |
| INDEX | 6 | 14 | 10 | 2 | 18 | 12 | 8 | 6 | 4 | - | 0 |
| HOLE | 10 | 11 | 12 | 13 | 14 | 15 | 16 | 17 | 18 | IN | Total |
| PAR | 4 | 5 | 3 | 4 | 4 | 4 | 3 | 5 | 4 | 36 | 72 |
| BLACK | 418 | 552 | 202 | 338 | 476 | 436 | 194 | 536 | 482 | 3634 | 7329 |
| BLUE | 390 | 520 | 192 | 314 | 439 | 394 | 184 | 488 | 452 | 3373 | 6777 |
| WHITE | 383 | 483 | 162 | 277 | 403 | 370 | 165 | 453 | 416 | 3112 | 6189 |
| RED | 347 | 441 | 142 | 252 | 361 | 334 | 152 | 410 | 380 | 2819 | 5601 |
| INDEX | 13 | 9 | 7 | 17 | 1 | 15 | 5 | 11 | 3 | - | - |
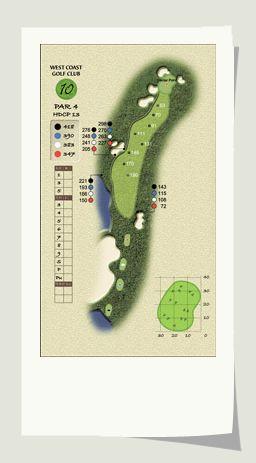 【Hole 10: Par 4】 A slight dog-leg right, this par 4 is a good test to start the back nine. Hitting your tee shot down the right side will leave a much shorter approach, but keep in mind that with that line you will be bringing the bush area into play that runs along the right of the cart path. A fairway metal off the tee here is not a bad option as this will take the left bunkers out of play leaving an approach of 160-190 yards. The green is quite long from front to back, with a bunker at the front/left and back/left. |
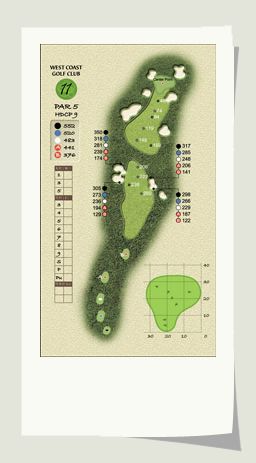 【Hole 11: Par 5】 With a generous landing area, a good tee shot down the left side (fairway slopes right) will leave an approach distance that will give the longer hitters a chance of reaching this green in 2. For the average length players this hole still offers a good opportunity at birdie as most third shots will be from less than 100 yards. This green is guarded by a deep bunker in front and has pretty good slope from back to front. |
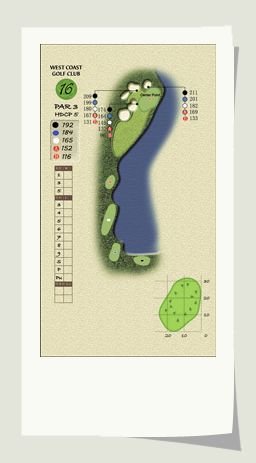
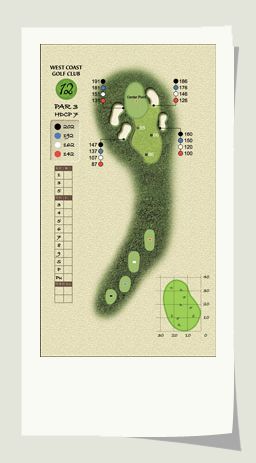 【Hole 12: Par 3】 This par 3 is long (nearly 200 yards) and uphill, so it will be a hybrid or fairway metal for most players. A few bunkers dot the right side of the green complex and the putting surface has a gentle slope from front to back. Par here is a good score, but don’t be too upset with a bogey, there are still a few opportunities to get one back. |
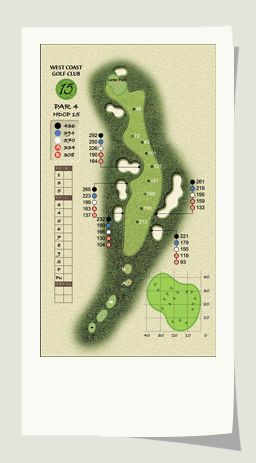
 【Hole 13: Par 4】 At just over 300 yards this hole presents an option for the big hitters to go for the green. The smarter play would be a long-iron, hybrid or fairway metal off the tee, leaving a short-iron approach to set up a good chance for birdie. The putting surface slopes back to front, but not too severe. There is a bunker at the back of the green not visible from the fairway. |
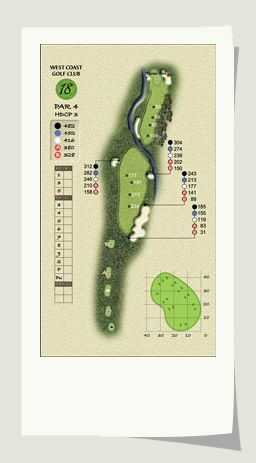
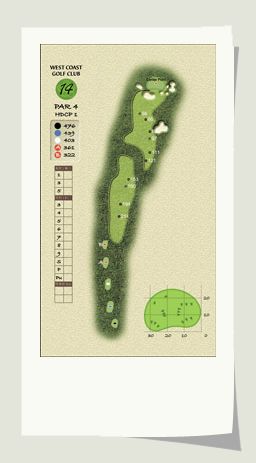 【Hole 14: Par 4】 This long par 4 has the fairway running up the left side. Right of the fairway is a generous collection area that majority of tee shots will end up. Approach shots will be in the 180-220 range so playing this hole with 5 in mind being a good score will be a good strategy. Get your second shot near to the green or on it. Get away with par or bogey and you’ll have done well here. |
 【Hole 15: Par 4】 This is a good test, a dog-leg left, uphill to a tricky green. A good tee shot up the left side of the fairway will cut 20+ yards off your approach. Right handers that have confidence hitting a draw will have an advantage here. Approach shots will be in the mid to long-iron range (maybe hybrid) to a green protected by bunkers at the front and back of the green. Birdies are rare here, but if you’re lucky enough to score a 3 you can take that confidence with you for a strong finish over the final 3 holes. |
 【Hole 16: Par 3】 This is the signature hole at West Coast Golf Club, with water protecting the entire right side from tee to green. There is room to play safe down the left side, but there is also a couple of well placed bunkers to the front left of the green that will add to the difficulty of playing this hole. Playing a good, solid shot to the middle of the green will secure a par and give a moderate chance for birdie. Walk away with a par here, that will be a nice feeling to take with you to the next hole where birdie is very possible. |
 【Hole 17: par 5】 Find the fairway from the tee and there’s a definite chance to reach this green in 2 shots. For the shorter hitters this hole still presents a birdie opportunity as most third shots will be from less than 100 yards. There is a stream that runs across the fairway at 285 yards from the tee, so play to less than that and you’ll be in prime position to attack this green in 2. The green is guarded by 3 bunkers, one at front/left, one to the right, and one at the rear of the putting surface. Get away from here with a birdie or par giving you confidence for the final test, the 18th. |
 【Hole 18: Par 4】 A good finishing hole, long and not much room for error. It puts a premium on finding the fairway with your tee shot. There is a large fairway bunker running along the right side, if you happen to find it getting to the green in 2 will become quite difficult. Good tee shots usually leave a long iron, hybrid or fairway metal to the green. The longer hitters may get to within mid-iron approach range, but they will also need to keep in mind that there is a creek that runs across the fairway at 300 yards from the tee. Bear down and get it on or near this green in two for a chance to finish strong. The green is protected by a bunker front/left and front/right. There is some good slope to this putting surface. |